Home
/ How To Add Crop Marks In Illustrator - Select use document bleed to use the bleed settings defined in the new document.
How To Add Crop Marks In Illustrator - Select use document bleed to use the bleed settings defined in the new document.
How To Add Crop Marks In Illustrator - Select use document bleed to use the bleed settings defined in the new document.. Under printer's marks, select marks and bleeds, then select the crop marks box. Under bleeds, click both allow bleeds and bleed marks. how to add print marks in adobe illustrator. When the page is printed, the crop marks will be moved inward the specified distance. Click the add printer marks. You can specify a bleed from 0.0 to 0.125 inches.
Then from the set page box dialog box, you can add crop mark and bleed mark here. In this tutorial i will show you how to add crops marks easily in adobe illustrator. Go to page > page boxes. Here there are various options you can choose for your document. But this will use the last used pdf settings so if that was a setting that had crop marks set as 'on.
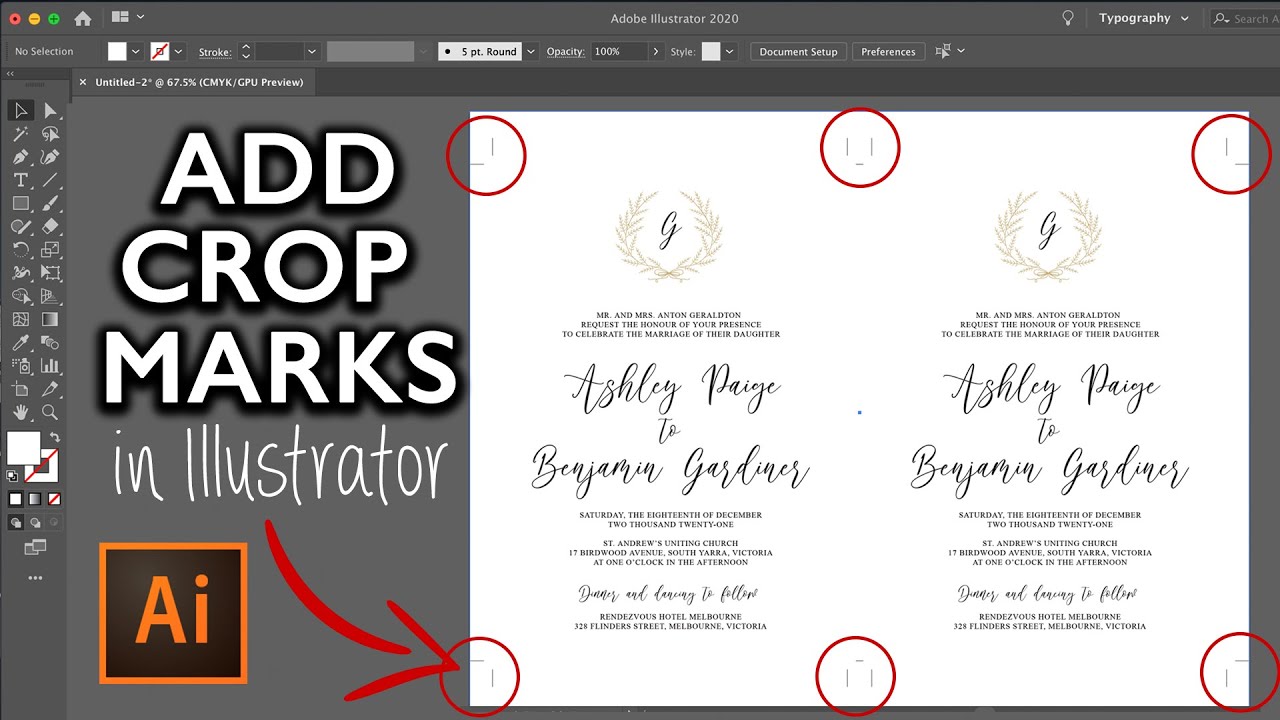
How To Add Crop Marks In Adobe Illustrator 2 Or More Items Per Page Diy Wedding Invitations Youtube from i.ytimg.com Select use document bleed to use the bleed settings defined in the new document. In cs4 or newer, select effect>crop marks to create the correct type of crop marks in illustrator. If you have any questions or comments regarding this video or the program used, then feel free to add them to the section below. To use crop marks, do the following: Click the link icon to make all the values the same. You're likely reading this because you've noticed that the crop marks (裁剪标记 cái jiǎn biāo jì) in the effects menu (效果 xiào guǒ) doesn't work for irregular shapes. Like all illustrator effects, the crop marks effect can be applied to objects, groups, and layers. I will also show you how to add multiple crop marks to 2 or more items o.
In cs3 or older, select filter>create>crop marks.
Adobe illustrator makes it easy to add a bleed to an existing artboard. To create crop marks as live effect, select effect > crop marks. Step 3 adobe illustrator's automatic crop marks remain editable. Enter values for top, left, bottom, and right to specify the placement of the bleed marks. File > document setup set the four bleed values to 0.25 This is a visihow tutorial on how to add crop marks to an object in adobe illustrator cs6 in windows 7. Press shift question mark to access a list of keyboard shortcuts. Click the link icon to make all the values the same. Type in the documents size. Under adobe pdf preset, select high quality print and click marks and bleeds from the panel on the left side of the window. Under printer's marks, select marks and bleeds, then select the crop marks box. Click to select trim marks and click use document bleed settings and save pdf. In cs3 or older, select filter>create>crop marks.
Go to page > page boxes. Under printer's marks, select marks and bleeds, then select the crop marks box. The good news is that you don't need crop marks for irregular shapes, just the bleed. Choose trim marks and bleed marks. Go to file then print. select marks & bleed, which is located on the left side of the print dialog box.
What Are Crop Marks And Why Would You Want To Print Them Microsoft 365 Blog from www.microsoft.com To create crop marks as live effect, select effect > crop marks. Here there are various options you can choose for your document. Thank you for choosing visihow! This basically means that when you send a print ready file to us, an extra 3mm (or 5mm for large format designs) of colour or image is provided around the edge of your artwork (the 'bleed') and cutting markers (the crop marks) placed at each corner to show where the. The good news is that you don't need crop marks for irregular shapes, just the bleed. To use crop marks, do the following: Go to page > page boxes. Make crop or trim mark in illustrator for cutting | illustrator tutorialhey everyone !
Just simply select cropbox or bleedbox from the margin setting.
This basically means that when you send a print ready file to us, an extra 3mm (or 5mm for large format designs) of colour or image is provided around the edge of your artwork (the 'bleed') and cutting markers (the crop marks) placed at each corner to show where the. Open the object menu and choose create trim marks to display an editable set of corner marks at the four corners of the invisible bounding box that defines the overall height and width of your artwork. Select use document bleed to use the bleed settings defined in the new document. Choose all pages under page range. Add crop marks and bleeds in an existing illustrator file if you already have a file completed and are looking to add a bleed to it: In this tutorial we will learn how to make a crop or cutting mark in i. You can specify a bleed from 0.0 to 0.125 inches. To create editable trim marks or crop marks, select object > create trim marks. Then from the set page box dialog box, you can add crop mark and bleed mark here. To create a document with bleeds, open illustrator and click. Thank you for choosing visihow! Click the link icon to make all the values the same. Select marks & bleed on the left side of the print dialog box.
Thank you for choosing visihow! Do not use save as or you lose the other pages of the doc. In the print with preview dialog box, check the box show more options. in the output area, check the corner crop marks box, then click the bleed button. If you are working on several items on a single artboard in illustrator, you may want trim marks around each item or set. Choose trim marks and bleed marks.
A Printer S Guide To Crop Marks And Registration Marks from d1mkprg9bp64fp.cloudfront.net File > document setup set the four bleed values to 0.25 When the page is printed, the crop marks will be moved inward the specified distance. Click to select trim marks and click use document bleed settings and save pdf. Create crop marks around an object. Select the kinds of printer's marks you want to add. In cs3 or older, select filter>create>crop marks. Method 2 adding a bleed to an existing document Do one of the following:
Do one of the following:
This basically means that when you send a print ready file to us, an extra 3mm (or 5mm for large format designs) of colour or image is provided around the edge of your artwork (the 'bleed') and cutting markers (the crop marks) placed at each corner to show where the. Create crop marks around an object. Click the link icon to make all the values the same. This will open the document set up menu. To create crop marks as live effect, select effect > crop marks. To edit an existing pdf you need to just hit 'save' to retain the other pages you weren't looking at. And set the amount of bleed or crop by entering the specified number. Type in the documents size. To create a document with bleeds, open illustrator and click. Method 2 adding a bleed to an existing document Go to page > page boxes. Learn how to create crop marks for your artwork in adobe illustrator. You will be asked to provide your artwork with 'crops and bleed' for us to print it correctly.

